Saturday, April 25, 2020

Just Announced - St. Augustine Florida Birds Workshop


Join me next April in St. Augustine, Florida for some of 
the best 
bird photography anywhere! This is the time 
of 
year when 
some of the most beautiful birds like 
Roseate Spoonbills, 
Great Egrets, Snowy Egrets, 
and several species of 
Herons arrive in 
their 
breeding plumage.


The birds will be nesting, mating, and raising chicks, and all this will be happening close to us at eye level.

We will be in a private rookery that is beautifully designed with walkways that put us at tree-top level with the birds. This provides us with the best chances of getting close-up shots, and no long lenses are needed. All birds are truly wild, but are not bothered by our presence.

We will have special early access to the rookery before it opens to the public. And it is a short walk into and around the rookery. Super bird photography does not get any better, or any easier than this.

In addition to the birds there will be shooting opportunities in the historic areas of St. Augustine, which bills itself as America's Oldest City. It is the home of significant landmarks like Castillo de San Marcos, Flagler College, the Lightner Museum, and more.

This unique workshop includes:
- early entry and private time photographing birds in the rookery
- personalized instruction to make your bird photography the best it can be
- all rookery entry fees
- trolley and self-guided walking tour of historic St. Augustine
- image critiques
- Lightroom and Photoshop tips

Workshop is limited to 12 photographers

FEE: Early sign-up fee is $1995 if you register no later than June 1. After that the regular rate of $2495 applies. Fee includes all entry fees into the rookery, trolley tour of historic St. Augustine, extensive personalized instruction, image critiques, both in-the-field and classroom training, and Lightroom and Photoshop tips. (Not included are lodging, meals, transportation, and personal incidentals. Special hotel rates have been arranged.)

DEPOSIT: A $500 deposit will reserve your space.

ITINERARY: Workshop begins in the late afternoon on Tuesday, April 6 with an orientation and training session. Specific time and location will be provided when you register. Each day of the workshop will be a varied combination of bird photography, historic architecture, training, and image critiques. The workshop officially ends after a morning rookery visit on Sunday, April 11.

FOR MORE INFORMATION OR TO REGISTER

EMAIL
awakethelightphoto@icloud.com

or CALL 757-773-0194

Saturday, April 18, 2020

More Fun At Home - Photo Projects Lesson 3


This is another great technique for keeping your creative juices flowing while you are stuck at home during the pandemic. Sometimes you just want to have fun, and what better time than now! If you have Photoshop or Photoshop Elements you can create unusual images easily.

Today's image is just one example
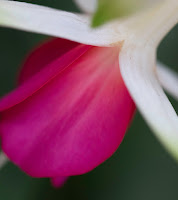
ORIGINAL IMAGE
of what you can do with almost any image already in your files. Here is the original image, a flower shot at a botanical gardens. Try this
technique with flowers or birds or scenics or anything else that appeals to you. You won't know which images work best until you experiment with several different ones. And you can crop and do some post-processing on the original image before starting on the technique below.

Here are the easy steps used to create the final version:

1. Make sure to start with an 8-bit image. Only 8-bit images will work with all the Photoshop filters. (Some filters will work with 16-bit images, which is a typical default bit size for most images, but not all filters can be used unless the image is an 8-bit.) It is easy to do the conversion in Photoshop by going to Image > Mode. Then click on "8-bit" if it is not already checked. Now you are ready to work some magic!

2. Go to Filter > Distort > Polar Coordinates. Click on the "Polar to Rectangular" button (the lower button) and then click OK.

3. Next flip the image upside down by going to Image > Image Rotation > Flip Canvas Vertical.

4. Again go to Filter > Distort > Polar Coordinates. This time click on the "Rectangular to Polar" button (the upper button) and click OK.

5.  Now you have the basic distorted image, similar to the top image in today's Blog. I did not make any additional changes, but you can crop it if you wish, or change the color using Photoshop's color balance options, or make any other changes that you feel enhance the image.

So try this on a variety of different images and enjoy the results!

TECH SPECS
1/160 sec at f/2.8, ISO 400. Canon 100mm f/2.8L IS Macro lens on Canon 7D Mark II body. Handheld.

TODAY'S QUOTE: "Every adversity brings new experiences and new lessons."  -- Lailah Gifty Akita

Saturday, April 11, 2020

Happy Easter - Happy Passover


Happy Easter
Happy Passover


Even though we are all practicing the recommended social distancing and cannot spend time face-to-face with friends and family, we can still feel the warmth of Spring, and keep those personal connections strong. We can connect with those we love via all the great options available to us in our digital age - Skype or FaceTime or Zoom or Facebook or other options that allow us to speak with those far away and see their faces.

While the pandemic has turned many lives upside down, we can still be thankful for what we have, and can feel close to those we love and cherish. Keep those connections strong. The support of family and friends will help all of us cope with the New Normal, and help us be strong and look forward to a time when all this will be behind us. A time when we can hug, laugh together, and enjoy better times.

I am eager to be able to travel again, conduct workshops, and see all my friends and fellow travelers. And we WILL have those times again!

But for now, please follow the guidelines medical and governmental authorities advise, be patient as we wait for the pandemic to end, stay more than 6 feet away from others, enjoy a quieter, less hectic time, and wash wash wash your hands!

Mollie

Saturday, April 4, 2020

More Fun Photo Projects - Photo Projects Lesson 2


Today's lesson will help you turn lemons into lemonade. We all have images we shot some time ago that we want to like but they just do not have the pop or impact we expected. This is a great time to review some of your old images to see if another attempt at improving them in Lightroom can bring them back from the brink of boring.

As you know, Lightroom is my software of choice for nature and wildlife images. It can powerfully bring an image to life without making it look overdone or unrealistic. And that is the key to award-winning nature images - full of impact and beauty but without an artificial look.

The Before and After images above are the same shot. The Before image is the RAW image before processing, and the After is the same image after being processed in Lightroom.

It was a beautiful, pristine dawn in Jasper National Park in Canada, but you would never know that by looking at the Before image. It looks gray, dull, and unexciting. While there were pinks and blues in the sky, and lovely fall colors on the hillsides across the lake, they do not appear in the original RAW image. Why?

In general, regardless of the brand of camera you use, camera sensors are designed to be "dumbed down." What does that mean? It means that digital camera sensors were designed to do their jobs quickly, and in order to do that the sensor will capture an image (this applies to RAW images) with all the detail and color that was there, BUT our eyes will not see all that without using post-processing software to bring out the latent details in the RAW image. While this is an oversimplification, the bottom line is that you will rarely see the degree of contrast and the accuracy of colors in a RAW image as it initially comes out of the camera. Some post-processing is needed on virtually every image in order to bring out what you really saw. Some images need more optimization than others.

Because this image was shot pre-sunrise, it inherently had low contrast and the colors were somewhat muted. Add to that the nature of camera sensors I mentioned, and you have a Before image that is gray and lifeless. I wanted to bring out the colors and contrast that my eye saw when I was there, and that required some help from Lightroom.

The "fix" took about 5 minutes, and brought the image closer to what I actually saw. I admit that I did punch the blues and pinks a bit more than were really there, but they still look natural.

The simple steps in Lightroom to improve this image were:
1. Lightened the shadows with the Shadows Slider.
2. Brightened the whites with the Whites Slider so that the mist on the horizon looked white.
3. Increased Clarity to boost the mid-tone contrast.
4. Increased overall Vibrance.
5. Used the HSL panel to pinpoint increases in the saturation of the pinks, blues, and yellows.

That's it. Just those few easy steps brought this image to life.

So now that we have lots of time at home, a great project is to go back over some of your older images and re-work them in Lightroom to see how much you can improve them. You will be amazed at what you can do, even on old images that you have already processed.

Once you get into this, you can spend many happy days creating "new" and better images from ones already living in your photo files. And remember, for your health and well-being get up and stretch or walk around every 30 minutes or so, even though it is easy to sit for hours and not realize it!

TECH SPECS
2.5 seconds at f/22, ISO 200. Canon 17-40mm f/4L lens set at 17mm on Canon 6D body (an oldie but a goodie!). Gitzo tripod with Really Right Stuff ballhead.

TODAY'S QUOTE: "Learn as if you were to live forever."  --Mahatma Gandhi